1. Dice系数的介绍及实现
Dice系数原理
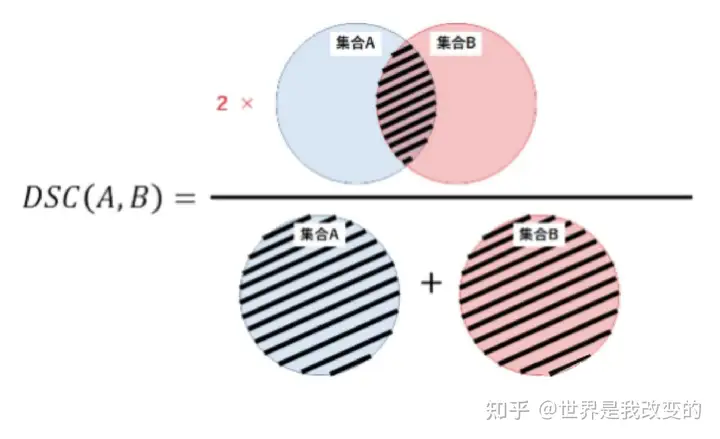
Dice是医学图像比赛中使用频率最高的度量指标,它是一种集合相似度度量指标,通常用于计算两个样本的相似度,值阈为[0, 1]。在医学图像中经常用于图像分割,分割的最好结果是1,最差时候结果为0.
Dice系数计算公式如下:
Dice=2∗(pred⋂true)pred⋃trueDice = \frac{2 * (pred \bigcap true)}{pred \bigcup true}
其中pred为预测值的集合,true为真实值的集合,分子为pred和true之间的交集,乘以2是因为分母存在重复计算pred和true之间的共同元素的原因。分母为pred和true的并集。
将 (pred⋂true)(pred \bigcap true) 近似为预测图pred和真实图true之间的点乘,再将点乘的元素结果相加:
(1)预测分割图与真实分割图的点乘:
(pred⋂true)=[0.020.010.010.030.040.120.150.070.960.930.940.920.870.970.960.97]∗[0000000011111111](pred \bigcap true) = \begin{bmatrix} 0.02 & 0.01 & 0.01 & 0.03 \\ 0.04 & 0.12 & 0.15 & 0.07 \\ 0.96 & 0.93 & 0.94 & 0.92 \\ 0.87 & 0.97 & 0.96 & 0.97 \\ \end{bmatrix} * \begin{bmatrix} 0 & 0 & 0 & 0 \\ 0 & 0 & 0 & 0 \\ 1 & 1 & 1 & 1 \\ 1 & 1 & 1 & 1 \\ \end{bmatrix}
(2)点乘之后,所有元素相加:
0.96+0.93+0.94+0.92+0.87+0.97+0.96+0.97= 7.52">(pred⋂true)=[000000000.960.930.940.920.870.970.960.97]−>0.96+0.93+0.94+0.92+0.87+0.97+0.96+0.97=7.52(pred \bigcap true) = \begin{bmatrix} 0 & 0 & 0 & 0 \\ 0 & 0 & 0 & 0 \\ 0.96 & 0.93 & 0.94 & 0.92 \\ 0.87 & 0.97 & 0.96 & 0.97 \\ \end{bmatrix} -> 0.96+0.93+0.94+0.92+0.87+0.97+0.96+0.97= 7.52
对于二分类的问题,真实的分割图是one-hot编码的只有0,1两个值,所以可以有效的将在pred分割图中未在true分割图中激活的所有像素清零。对于激活的像素,主要是惩罚低置信度的预测,较高值会得到更高的Dice的系数。
(3)计算分子并集,采用元素直接相加:
7.97">pred=[0.020.010.010.030.040.120.150.070.960.930.940.920.870.970.960.97]−>7.97pred = \begin{bmatrix} 0.02 & 0.01 & 0.01 & 0.03 \\ 0.04 & 0.12 & 0.15 & 0.07 \\ 0.96 & 0.93 & 0.94 & 0.92 \\ 0.87 & 0.97 & 0.96 & 0.97 \\ \end{bmatrix} -> 7.97
8">true=[0000000011111111]−>8true = \begin{bmatrix} 0 & 0 & 0 & 0 \\ 0 & 0 & 0 & 0 \\ 1 & 1 & 1 & 1 \\ 1 & 1 & 1 & 1 \\ \end{bmatrix} -> 8
当然Dice也有另一个表达方式,是利用混淆矩阵重的TP,FP,FN来表达:
Dice=2∗TPFP+2∗TP+FN\text{Dice} = \frac{2 * \text{TP}}{\text{FP} + 2 * \text{TP} + \text{FN}}
该公式原理如下图:
现MindSpore代码实现
(同时简单介绍一下MindSpore,MindSpore,新一代AI开源计算框架。
创新编程范式,AI科学家和工程师更易使用,便于开放式创新;该计算框架可满足终端、边缘计算、云全场景需求,能更好保护数据隐私;可开源,形成广阔应用生态。
2020年3月28日,华为在开发者大会2020上宣布,全场景AI计算框架MindSpore在码云正式开源。MindSpore着重提升易用性并降低AI开发者的开发门槛,MindSpore原生适应每个场景包括端、边缘和云,并能够在按需协同的基础上,通过实现AI算法即代码,使开发态变得更加友好,显著减少模型开发时间,降低模型开发门槛。
通过MindSpore自身的技术创新及MindSpore与华为昇腾AI处理器的协同优化,实现了运行态的高效,大大提高了计算性能;MindSpore也支持GPU、CPU等其它处理器。 )
"""Dice"""
import numpy as np
from mindspore._checkparam import Validator as validator
from .metric import Metric
class Dice(Metric):
def __init__(self, smooth=1e-5):
super(Dice, self).__init__()
self.smooth = validator.check_positive_float(smooth, "smooth")
self._dice_coeff_sum = 0
self._samples_num = 0
self.clear()
def clear(self):
# 是来清除历史数据
self._dice_coeff_sum = 0
self._samples_num = 0
def update(self, *inputs):
# 更新输入数据,y_pred和y,数据输入类型可以是Tensor,lisy或numpy,维度必须相等
if len(inputs) != 2:
raise ValueError(Dice need 2 inputs (y_pred, y), but got {}.format(len(inputs)))
# 将数据进行转换,统一转换为numpy
y_pred = self._convert_data(inputs[0])
y = self._convert_data(inputs[1])
self._samples_num += y.shape[0]
if y_pred.shape != y.shape:
raise RuntimeError(y_pred and y should have same the dimension, but the shape of y_pred is{},
the shape of y is {}..format(y_pred.shape, y.shape))
# 先求交集,利用dot对应点相乘再相加
intersection = np.dot(y_pred.flatten(), y.flatten())
# 求并集,先将输入shape都拉到一维,然后分别进行点乘,再将两个输入进行相加
unionset = np.dot(y_pred.flatten(), y_pred.flatten()) + np.dot(y.flatten(), y.flatten())
# 利用公式进行计算,加smooth是为了防止分母为0,避免当pred和true都为0时,分子被0除的问题,同时减少过拟合
single_dice_coeff = 2 * float(intersection) / float(unionset + self.smooth)
# 对每一批次的系数进行累加
self._dice_coeff_sum += single_dice_coeff
def eval(self):
# 进行计算
if self._samples_num == 0:
raise RuntimeError(Total samples num must not be 0.)
return self._dice_coeff_sum / float(self._samples_num)
使用方法如下:
import numpy as np
from mindspore import Tensor
from mindspore.nn.metrics Dice
metric = Dice(smooth=1e-5)
metric.clear()
x = Tensor(np.array([[0.2, 0.5], [0.3, 0.1], [0.9, 0.6]]))
y = Tensor(np.array([[0, 1], [1, 0], [0, 1]]))
metric.update(x, y)
dice = metric.eval()
print(dice)
0.20467791371802546
每个batch(两组数据)进行计算的时候如下:
import numpy as np
from mindspore import Tensor
from mindspore.nn.metrics Dice
metric = Dice(smooth=1e-5)
metric.clear()
x = Tensor(np.array([[0.2, 0.5], [0.3, 0.1], [0.9, 0.6]]))
y = Tensor(np.array([[0, 1], [1, 0], [0, 1]]))
metric.update(x, y)
x1= Tensor(np.array([[0.2, 0.5], [0.3, 0.1], [0.9, 0.6]]))
y1 = Tensor(np.array([[1, 0], [1, 1], [1, 0]]))
metric.update(x1, y1)
avg_dice = metric.eval()
print(dice)
2. Dice Loss介绍及实现
Dice Loss原理
Dice=1−2∗(pred⋂true)pred⋃trueDice = 1 - \frac{2 * (pred \bigcap true)}{pred \bigcup true}
该原理是在Dice系数的基础上进行计算,用1去减Dice系数。
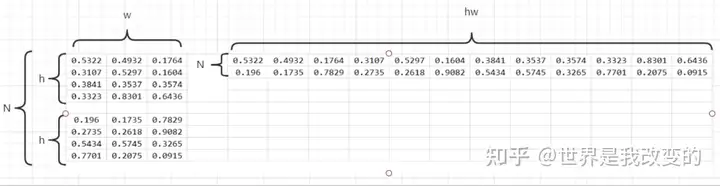
这种是在二分类一个批次只有一张图的情况,当一个批次有N张图片时,可以将图片压缩为一维向量,如下图:
对应的label也会相应变化,最后一起计算N张图片的Dice系数和Dice Loss。
MindSpore二分类DiceLoss代码实现
class DiceLoss(_Loss):
def __init__(self, smooth=1e-5):
super(DiceLoss, self).__init__()
self.smooth = validator.check_positive_float(smooth, "smooth")
self.reshape = P.Reshape()
def construct(self, logits, label):
# 进行维度校验,维度必须相等。(输入必须是tensor)
_check_shape(logits.shape, label.shape)
# 求交集,和dice系数一样的方式
intersection = self.reduce_sum(self.mul(logits.view(-1), label.view(-1)))
# 求并集,和dice系数一样的方式
unionset = self.reduce_sum(self.mul(logits.view(-1), logits.view(-1))) + \
self.reduce_sum(self.mul(label.view(-1), label.view(-1)))
# 利用公式进行计算
single_dice_coeff = (2 * intersection) / (unionset + self.smooth)
dice_loss = 1 - single_dice_coeff / label.shape[0]
return dice_loss.mean()
@constexpr
def _check_shape(logits_shape, label_shape):
validator.check(logits_shape, logits_shape, label_shape, label_shape)
使用方法如下:
import numpy as np
import mindspore.common.dtype as mstype
import mindspore.nn as nn
from mindspore import Tensor
loss = nn.DiceLoss(smooth=1e-5)
y_pred = Tensor(np.array([[0.2, 0.5], [0.3, 0.1], [0.9, 0.6]]), mstype.float32)
y = Tensor(np.array([[0, 1], [1, 0], [0, 1]]), mstype.float32)
output = loss(y_pred, y)
print(output)
[0.7953220862819745]
MindSpore多分类MultiClassDiceLoss代码实现
在MindSpore中支持在语义分割中有多种损失函数可以选择,不过最常用的还是用交叉熵来做损失函数。
class MultiClassDiceLoss(_Loss):
def __init__(self, weights=None, ignore_indiex=None, activation=A.Softmax(axis=1)):
super(MultiClassDiceLoss, self).__init__()
# 利用Dice系数
self.binarydiceloss = DiceLoss(smooth=1e-5)
# 权重是一个Tensor,应该和分类数的维度一样:Tensor of shape `[num_classes, dim]`。
self.weights = weights if weights is None else validator.check_value_type("weights", weights, [Tensor])
# 要忽略的类别序号
self.ignore_indiex = ignore_indiex if ignore_indiex is None else \
validator.check_value_type("ignore_indiex", ignore_indiex, [int])
# 使用激活函数
self.activation = A.get_activation(activation) if isinstance(activation, str) else activation
if activation is not None and not isinstance(self.activation, Cell):
raise TypeError("The activation must be str or Cell, but got {}.".format(activation))
self.activation_flag = self.activation is not None
self.reshape = P.Reshape()
def construct(self, logits, label):
# 进行维度校验,维度必须相等。(输入必须是tensor)
_check_shape(logits.shape, label.shape)
# 先定义一个loss,初始值为0
total_loss = 0
# 如果使用激活函数
if self.activation_flag:
logits = self.activation(logits)
# 按照标签的维度的第一个数进行遍历
for i in range(label.shape[1]):
if i != self.ignore_indiex:
dice_loss = self.binarydiceloss(logits[:, i], label[:, i])
if self.weights is not None:
_check_weights(self.weights, label)
dice_loss *= self.weights[i]
total_loss += dice_loss
return total_loss/label.shape[1]
使用方法如下:
import numpy as np
import mindspore.common.dtype as mstype
import mindspore.nn as nn
from mindspore import Tensor
loss = nn.MultiClassDiceLoss(weights=None, ignore_indiex=None, activation="softmax")
y_pred = Tensor(np.array([[0.2, 0.5], [0.3, 0.1], [0.9, 0.6]]), mstype.float32)
y = Tensor(np.array([[0, 1], [1, 0], [0, 1]]), mstype.float32)
output = loss(y_pred, y)
print(output)
[0.7761003]
Dice Loss 存在的问题:
训练误差曲线非常混乱,很难看出关于收敛的信息。尽管可以检查在验证集上的误差来避开此问题。
更多MindSpore资料如下,感谢使用,欢迎Fork:
MindSpore官网www.mindspore.cn/
MindSpore/mindsporegitee.com/mindspore/mindspore
以上就是关于《Dice 与Dice Loss介绍及MindSpore的实现代码(dice game破解版)》的全部内容,本文网址:https://www.7ca.cn/tg/41199.shtml,如对您有帮助可以分享给好友,谢谢。